
Guides to the SITE-SECURITY customer portal
We have gathered a range of guides and instructions on how to use our customer portal.
We are constantly developing new features - and therefore also continuously creating new guides. If you are missing a guide or have any other questions, you are always welcome to contact us.
If you experience technical issues, please contact our technical operations at +45 88 80 84 48 or support@sitesecurity.eu
App setup
Notifications


It's easy to add our customer portal as an app on your mobile device, so you can quickly access the system and receive important notifications. When you open the portal on your mobile and are logged in, you’ll see a prompt that shows you how to easily add it to your home screen.
On iOS, we display the few necessary steps directly on the screen, so you can follow them easily – while on Android, you can add the app with a single tap.
If you choose not to add the app right away, we’ll remind you again later – and of course, you can always add it yourself via the browser menu.
Once you have added the customer portal as an app on your home screen, you can receive notifications directly on your mobile device. If your device supports it, you will automatically receive a prompt that makes it easy to enable notifications.
Notifications ensure that you are alerted to new items in the Focus Center – whether it concerns operations, activations, or other important events.
You can enable notifications on both mobile and computer, on as many devices as you like.
You can always manage your notification settings via the user menu in the bottom left corner.
Focus Center


When you log in to the customer portal, you are first greeted by the 'Overview' page, where you can, among other things, see the Focus Center – which gathers everything that requires your attention and gives you a quick overview of items that need your active involvement.
The Focus Center is continuously being expanded with new features, but even now it supports our vision of making security transparent, simple, and actionable.
The Focus Center follows you throughout the portal, from the 'Overview' page to the 'Units' list and on each individual unit.
Remember, you can receive notifications about Focus Center items when relevant – on mobile, computer, and email.
Sites and units

On the ‘Units’ page, you will also find a complete overview of the sites and units you have access to.
From here, depending on your role, you can manage everything from security schedules, disarming, and security levels to site contacts and report recipients. You can also navigate to a specific unit for, among other things, live view.
In other words, everything you need to have control over and insight into your security solution is gathered in one place.
Live view
Alarms

Live view from mobile

Alarms from mobile
It is quick and easy to log in and see live view from your units - both from mobile and desktop. You can access this either from the overall ‘Live view’ overview via the menu or when you click into a specific unit via the ‘Units’ page.
You also have full flexibility to invite other users who can access live view - either across all sites or limited to specific ones. Users can be given restricted access or access to multiple parts of the system.
From your mobile or desktop, you can easily log in and find details and video clips from the most recent alarms we have handled. You can access them either from the overall ‘Alarms’ report via the menu or when you click into a specific unit via the ‘Units’ page.
Simply click ‘Details’ next to a given alarm to see more information and video clips. You also have the option to download the clip.
Hybrid Generator

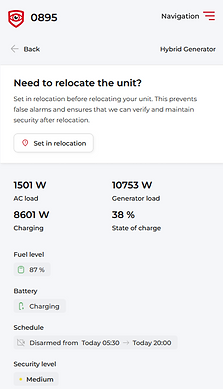
With the Hybrid Generator feature in the customer portal, you get a detailed and consolidated overview of the entire operation.
Across the portal, it is easy to track all key metrics in real time, including load, battery status, fuel level, and energy production/consumption as well as environmental performance. The technical data is made easy to understand and translated into actionable insights that you can act on.
You can access the data both on the 'Overview' page and in the 'Hybrid Generator' report via the menu, as well as by clicking into a specific generator on the 'Units' page.
Combined with the Focus Center and notifications, you get a platform that provides full visibility and helps you take quick action whenever something requires your attention.
Schedule
Temporary disarming

Schedule

Disarm from mobile
When the need arises, you can log in from your mobile or desktop and change the security schedules for the sites you have access to. It’s easy, clear, and quick to do.
On the ‘Units’ page, you will find a section for each site showing the current security status. Next to it, you’ll find ‘Schedule’, which you can click. When you open ‘Schedule’, you can simply adjust the security times day by day.
If you double-click on a time, you can then select ‘Copy day to entire week’, which is often easier than setting each day separately.
When you need to be present at a site during the security period - for example, in the evening or on a weekend - you can easily log in from your mobile or desktop and disarm. It’s quick and simple - and ensures that you won’t be alerted.
On the ‘Units’ page, you will find a section for each site showing the current security status. Next to it, you’ll find ‘Disarm’, which you can click. When you open ‘Disarm’, you need to select the disarm time and confirm.
You also have full flexibility to invite other users who can temporarily disarm. Users can be given restricted access or access to multiple parts of the system.
Site contacts and report recipients

As everyday routines change over time, you have the option to log in and adjust site contacts and report recipients for the sites you have access to - both from mobile and desktop.
On the ‘Units’ page, you will find a section for each site where you can click ‘Site contacts’ and ‘Report recipients’. When you open either ‘Site contacts’ or ‘Report recipients’, you can add, edit, and remove people as needed.
Site contacts are the people we contact regarding sites and units in general – there must always be at least one registered.
Report recipients are the people to whom we send automated email reports. They receive daily or instant relevant information - for complete insight and transparency. This gives you the opportunity to provide an overview to those who need it.
User management
Relocation


When you log in - from mobile or desktop - you can easily get an overview of which customer portal users your sites have, and manage them via the ‘Users’ page.
Users have access to all or parts of the customer portal. When you create or edit users, you will see a list of the roles you can choose (‘Account role’) – and what each role provides access to.
It is also possible to set site restrictions for a user (‘Restrict to specific sites’), so they only have access to certain sites. If no restriction is selected, the user will have access across all sites.
Please note that you can only view and manage users for the sites you have access to, from your role level and below.
As everyday routines change over time and the need arises to relocate a unit, you have the option to log in and activate a relocation mode for your device – both from mobile and computer.
You can find this option by clicking into a specific unit via the ‘Units’ page – from there, click ‘Set in relocation’ and confirm. You can now move the device on the site - and when you’re finished, return to the customer portal (ideally from your mobile) and click ‘Request activation’.
This notifies us, so we can check that everything is correct and activate continued monitoring and handling.
Please note that relocation is available for selected models and is simply an option for you to handle it yourself - we are always ready to assist or take care of it for you.
Full walkthrough of our customer portal
In this walkthrough, you’ll get a complete overview of the portal's key features. We'll show you how, in your daily operations, you can monitor events and alarms, gain insights through statistics and reports, and access documentation and history.
In addition, we'll go through how you can easily adjust security schedules, relocate or configure units, manage users and permissions, and much more - all gathered in one place.

Full walkthrough
Set up as app
If you want to have our customer portal easily accessible from your home screen, like an app on your mobile, simply open the customer portal in a mobile browser – then tap 'Share' and select 'Add to home screen'. In some browsers, however, 'Add to home screen' can be found via other shortcuts, such as an icon with three dots.
Below you will find guides for adding to the home screen for the most commonly used mobile browsers.